Bienvenue sur notre blog D'aujourd'hui. Aujourd'hui, nous voulons répondre à une question souvent posée par notre service D'Assistance: Comment puis-je flasher le chargeur de démarrage sur le Nano?
Les microcontrôleurs comme le NanoV3 sont livrés avec un chargeur de démarrage déjà enregistré. Diser permet de décrire le module via L'IDE Arduino avec des programmes.
Donc, si le module ne fonctionne plus, c'est peut-être parce que le chargeur de démarrage est défectueux. En outre, cette méthode permet de flasher des modules avec le chargeur de démarrage d'origine, de sorte que vous n'avez pas à sélectionner "old Bootloader" à chaque fois dans "processeur".
Pour reprogrammer la puce, nous avons besoin d'un programmateur. Pour cela, il existe des dispositifs de programmation spéciaux, mais la plupart ont déjà une solution appropriée dans le tiroir.
C'est pourquoi nous vous montrons aujourd'hui comment transformer le microcontrôleur, compatible avec Arduino UNO R3 en programmateur, et ainsi alimenter un Nano avec un nouveau chargeur de démarrage.
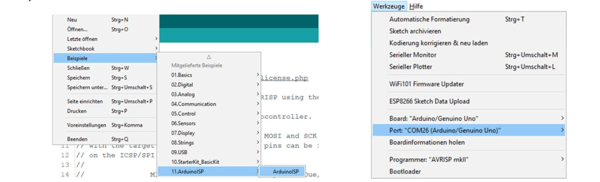
Pour ce faire, nous connectons le microcontrôleur au PC et démarrons les Arduinoïdes. Dans le menu "Fichier, nous allons à" exemples "- >" 11. ArduinoISP "- >"ArduinoISP".

Maintenant, nous nous assurons que nous avons sélectionné comme carte "Arduino/Genuino Uno" et que nous avons réglé le Port COM correct, et chargeons le Sketch sur notre microcontrôleur, compatible avec Arduino UNO R3.
Maintenant, nous câblons notre Uno avec notre NanoV3 comme nous le voyons ici dans L'image:

Vous pouvez éventuellement ajouter un condensateur de 10µm sur le contrôleur de programmation entre GND(-) et RESET (+).
Après avoir tout connecté correctement, nous devons effectuer quelques réglages dans L'IDE Arduino afin que nous puissions mettre en bouteille le nouveau chargeur de démarrage sur le Nano.
Pour ce faire, nous allons dans le menu "Outils" et sélectionnons le "Arduino Nano" comme carte. En tant que port Com, nous laissons L'Uno sélectionné, et en tant que programmeur, nous définissons "Arduino as ISP".
ATTENTION: les Options ArduinoISP et ArduinoISP.org ne fonctionnent pas, mais seulement de l'Entrée "Arduino comme FAI"
Après avoir vérifié à nouveau tous les paramètres, nous pouvons lancer le processus Flash via le menu "Outils" via "écrire le chargeur de démarrage". Après seulement quelques instants, le processus est terminé et notre Nano V3 est de nouveau prêt à l'emploi.


14 commentaires
Rolf Degen
Ich habe einen neuen Nano von Ihnen gekauft. Über USB kann er nicht programmiert werden. Ich habe einen alten AVRISP MK2 benutzt und es funktioniert. Einen neuen Bootloader habe ich mit AVRISP MK2 geflasht bekommen. Leider funktioniert der Upload über USB immer noch nicht.
Mein System: Win11 Arduino IDE 2.3.4
Vincie
I followed instruction (but used Mega 2560 board) and my Nano still dead. You missed important part: once you “and load the sketch on our microcontroller”(UNO), you have to disconnect it, right? (to make proper wiring). Then you connect again and make settings in IDE. But anyway after I selected “Burn bootloader” (not “WRITE”!) IDE complains:
“avrdude: stk500_recv(): programmer is not responding
avrdude: stk500_getsync() attempt 1 of 10: not in sync: resp=0×03
avrdude: Yikes! Invalid device signature.
Double check connections and try again, or use -F to override
this check.
Error while burning bootloader.
"
Where is the problem – Mega or Nano?
Jack
I had bought the 5 pack AZ-Delivery Nano V3, but did not work with upload under Arduino IDE 1.8.9. immediately. There is an new option under tools → Board: “Arduino Nano”, you have to select Processor: "ATmega328p (Old Bootloader). Then it works fine. Anyhow I have changed all the bootloaders to the Arduino UNO one.
The bootloader is shifted at the back of the flash memory, so you gain more flash memory to program (32256 bytes instead of 30720 bytes) . Fuses were also programmed like an Arduino UNO: E=0xFD, H=0xDE, L=0xFF. Works fine with LOCKBIT=0xFF.
When working with Arduino IDE 1.8.9 choose Board: “Arduino/Genuino UNO”, then you get the extra flash memory as well.
Hans W
Als Aruino IDE habe ich auf Ubuntu 64it laufen, Erkennt Ubuntu den USB Stick ohne weiteres?
Der USbasptreiber ist ja nur für Windows notwendig….
weiß das jemand weiter?
Und wie sieht das alles bei den Anderen Cotrollern hier bei AZ aus? muss man die nun alle auf nen Neuen Bootlader Flaschen?
danke für die Antwort
Bernd Albrecht
@ Hans-W: Sie haben doch schon die Lösung gefunden. Bei unseren Nanos wird unter Werkzeuge der Old Bootloader vorgewählt.
Hans W
Moin!
wasmacht man wenn man nur einen Nano hat?
ich habe da noch einen Stick kann man diesen auch benutzen? ,wenn ja wie?
danke für die Rückantwort….(bin noch grün!) habe gerade angefangen damit.
Die IDE meldet Fehler beim Hochladen, so ballt ich geändert habe auf OLD Bootlader Funktioniert es!
ich habe einen UsB -Stick (war mal für die Franzis Wetterstation mt bei).
Könnte auf die 6er Stift leiste am ende des Nanos Passen.
Danke für eurer Rückantwort
Volker Aumann
Verwendet man die Datei Beispiele=> 11.ArduinoISP => ArduinoISP ist der Hinweis in der Datei zu beachten:
// On some Arduinos (Uno,…), pins MOSI, MISO and SCK are the same pins as
// digital pin 11, 12 and 13, respectively. That is why many tutorials instruct
// you to hook up the target to these pins. If you find this wiring more
// practical, have a define USE_OLD_STYLE_WIRING. This will work even when not
// using an Uno. (On an Uno this is not needed).
Die Anweisung ’ #define USE_OLD_STYLE_WIRING’ ist in der Programmzeile 81 auskommentiert zu finden.
Maik
Nach meiner Recherche ist nichtmal unbedingt zu empfehlen den Bootloader zu ändern. Beim neuen Bootloader für den nano haben Arduino Leute scheinbar eine Option vergessen sodass der Bootloader 2k statt 0.5k.
Die hier angegebene Anleitung flasht einen Uno Bootloader, der nur 0.5k benötigt, allerdings muss man meines Wissens nach in Zukunft in der IDE dann auch Arduino Uno als Board auswählen wenn man den Nano programmieren will.
Der Bootloader fixed “nur” ein spezielles Problem in Verbindung mit Watchdog und erlaubt eine etwas höhere hochladegeschwindigkeit.
https://arduino.stackexchange.com/questions/51866/arduino-nano-atmega328p-bootloader-difference
Moerto
Top Anleitung!
Funktioniert bei mir einwandfrei. Danke!
losknossos
Hallo Volker, ich glaube ich habe den Fehler gefunden.
Das rote Kabel für die Stromversorgung muss vom 3,3V Augang des Programmers zum SEITLICHEN 3,3V-Eingang des Nanos gehen statt zu dem Pin auf dem Bild.
Das hat das Problem bei mir gelöst.
Volker Holst
Bei meinen Versuchen kommt immer wieder nach wenigen Sekunden die Meldung:
“Arduino: 1.8.5 (Windows 10), Board: “Arduino Nano, ATmega328P (Old Bootloader)”
avrdude: Expected signature for ATmega328P is 1E 95 0F
Double check chip, or use -F to override this check.
Fehler beim Brennen des Bootloaders."
und der Bootloader wird nicht auf den Nano gebrannt (weder alter noch neuer BL).
Reset direkt oder mit 10µ gegen GND bleibt egal.
Was kann die Urlache sein?
Auf den Uno R3 läßt sich das “Arduino as ISP” problemlos laden, ageschlossen nach Skizze / Tabelle oben.
Danke für die eventuelle Antwort.
Foobar
Bei mir kommt der Fehler:
Arduino: 1.8.8 (Linux), Board: “Arduino Nano, ATmega328P”
avrdude: stk500_recv(): programmer is not responding
avrdude: stk500_getsync() attempt 1 of 10: not in sync: resp=0×00
avrdude: stk500_recv(): programmer is not responding
avrdude: stk500_getsync() attempt 2 of 10: not in sync: resp=0×00
avrdude: stk500_recv(): programmer is not responding
avrdude: stk500_getsync() attempt 3 of 10: not in sync: resp=0×00
avrdude: stk500_recv(): programmer is not responding
avrdude: stk500_getsync() attempt 4 of 10: not in sync: resp=0×00
avrdude: stk500_recv(): programmer is not responding
avrdude: stk500_getsync() attempt 5 of 10: not in sync: resp=0×00
avrdude: stk500_recv(): programmer is not responding
avrdude: stk500_getsync() attempt 6 of 10: not in sync: resp=0×00
avrdude: stk500_recv(): programmer is not responding
avrdude: stk500_getsync() attempt 7 of 10: not in sync: resp=0×00
avrdude: stk500_recv(): programmer is not responding
avrdude: stk500_getsync() attempt 8 of 10: not in sync: resp=0×00
avrdude: stk500_recv(): programmer is not responding
avrdude: stk500_getsync() attempt 9 of 10: not in sync: resp=0×00
avrdude: stk500_recv(): programmer is not responding
avrdude: stk500_getsync() attempt 10 of 10: not in sync: resp=0×00
Fehler beim Brennen des Bootloaders.
Wie gehe ich nun weiter vor?
Gunther Knierim
Die folgende information von den Arduino Seiten ist hilfreich wenn ander Boards als der UnO als Programmer benutzt werden sollen.
The programming process uses VCC, GND and four data pins. Three pins connect MISO, MOSI and SCK between the programming micro and the target micro, the fourth pin from the programming micro goes to the reset pin of the target.
How to wire your boards
The following table display on which pins the MOSI, MISO and SCK are broken out on the different Arduino boards:
Arduino / Genuino Board MOSI MISO SCK Level
Uno or Duemilanove 11 or ICSP-4 12 or ICSP-1 13 or ICSP-3 5V
Mega1280 or Mega2560 51 or ICSP-4 50 or ICSP-1 52 or ICSP-3 5V
Leonardo ICSP-4 ICSP-1 ICSP-3 5V
Due ICSP-4 ICSP-1 ICSP-3 3,3V
Zero ICSP-4 ICSP-1 ICSP-3 3,3V
101 11 or ICSP-4 12 or ICSP-1 13 or ICSP-3 3,3V
MKR Family 8 10 9 3,3V
The SPI interface – and therefore these pins – is the interface used to program the AVR microcontrollers. Note that MISO, MOSI, and SCK are available in a consistent physical location on the ICSP header; this connector is used also by shields that rely on the SPI interface allowing the design of shields that work on every board.
Michael Reichelt
Bitte mehr Hintergrundinformationen: z.b. Was passiert generell bei dem Vorgang? Warum der Umweg über den Nano? Die Ardurino IDE kann das doch auch direkt über USB. mfg