Hello, everyone,
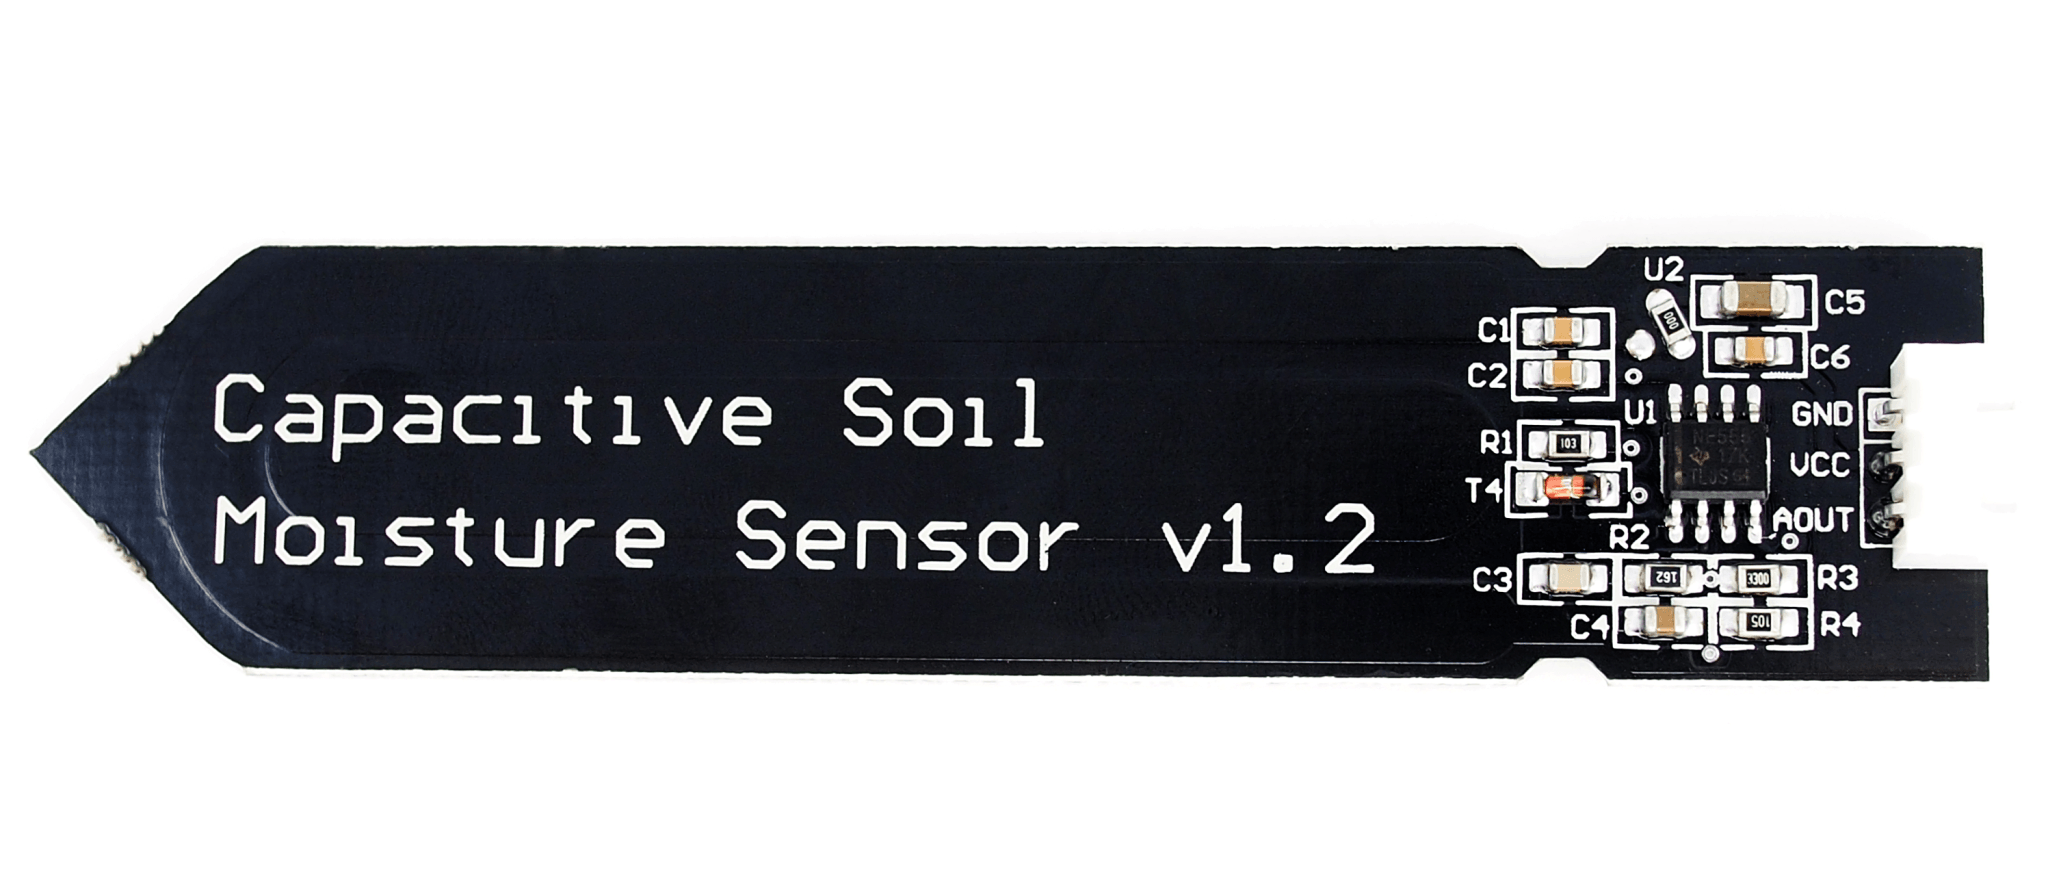
Today I would like to introduce you to a new sensor that we have in our shop. Our capacitive hygrometer V1.2
This module works capacitively, i.e. in contrast to the predecessor model there is no corrosion by galvanic processes. The output of this sensor is analog, i.e. although it supports 3.3V controllers, it cannot be read out by a Raspberry, which has no analog input. In principle, this sensor module is not only suitable for measuring the humidity in substrate, but also for displaying a fill level. Before we use the sensor productively our sketch has to be calibrated to the respective values.
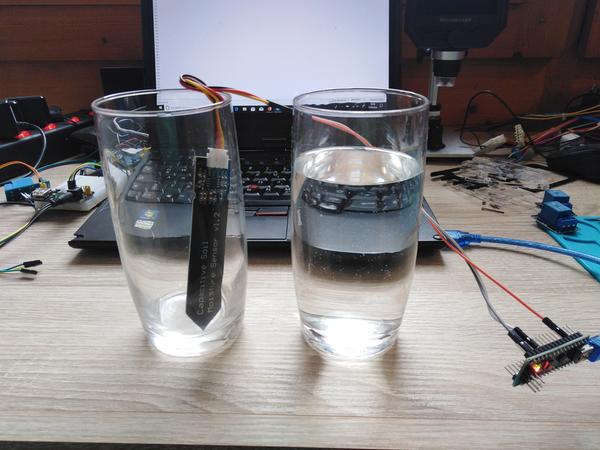
For our application example we use a NanoV3. And a glass of water instead of a flower pot, because the humidity of the substrate cannot be changed as easily as the level of a glass. Libarys are not required.
Pinout:
| Nanov3 | sensor |
| 5V+ | VCC |
| Gnd | Gnd |
| A0 |
Aout |
We start with the simplest commissioning, the analogreadserial example which is already integrated in the IDE: Examples -> Basics ->AnalogReadSerial
and receive the following edition in the serial monitor:

It looks a little more appealing in the serial plotter, but is still not ideal:

We use the smoothing tutorial on arduino.cc, here the code:
/*
  Smoothing

  created 22 Apr 2007
  by David A. Mellis  <dam@mellis.org>
  modified 9 Apr 2012
  by Tom Igoe

  This example code is in the public domain.

  http://www.arduino.cc/en/Tutorial/Smoothing
*/

const int numReadings = 10;

int readings[numReadings];      // the readings from the analog input
int readIndex = 0;              // the index of the current reading
int total = 0;                  // the running total
int average = 0;                // the average

int inputPin = A0;

void setup() {

  Serial.begin(9600);

  for (int thisReading = 0; thisReading < numReadings; thisReading++) {
    readings[thisReading] = 0;
  }
}

void loop() {
  // subtract the last reading:
  total = total - readings[readIndex];
  // read from the sensor:
  readings[readIndex] = analogRead(inputPin);
  // add the reading to the total:
  total = total + readings[readIndex];
  // advance to the next position in the array:
  readIndex = readIndex + 1;

  // if we're at the end of the array...
  if (readIndex >= numReadings) {
    // ...wrap around to the beginning:
    readIndex = 0;
  }

  // calculate the average:
  average = total / numReadings;
  Serial.println(average);
  delay(1);        // delay in between reads for stability
}
After we have uploaded the code, the optical edition is a little more pleasant:

So we find that the empty glass gives values around 792. Thus we have determined the highest value. Now we determine the lowest value by immersing our sensor in water to a height you specify.

The immersion depth, i.e. the height of the level in the glass/substrate must always remain the same for comparisons, we decided to use the point of v1.2 as a marker. And get the following values:

The full glass delivers approx. 419, i.e. we are in a range of 792 - 419. Please make sure to perform this calibration in the medium you want to use later, as the values vary depending on the substrate.
Because this sensor is so versatile, different substrates are possible, plants have different preferences and we can not estimate your scale, we provide here code that we have already used in our Alcotester have shown:
if (average >= 0 and average <= 400) {
    state = "Sensor defekt?";
  }
  else if (average >= 400 and average <= 500) {
    state = "Durst!";
  }
  else if (average >= 500 and average <= 649) {
    state = "Feucht!";
  }
  else if (average >= 650 and average <= 800) {
    state = "Patschnass!";
There is a housing for printing yourself, you will find the required files here.
Have fun trying and experimenting, maybe you will find a loyal reader who wants to make a smart drinking glass, which shows the bartender the level of his guests. :) Until the next post


9 comments
Robert
Achtung: Jeder zweite Sensor auf dem Markt funktioniert nicht richtig. Sehen Sie sich die Gründe im Video an:https://www.youtube.com/watch?v=IGP38bz-K48&ab_channel=Flaura-SmartPlantPot
in dem die Gründe erklärt werden.
Ich habe selbst ausprobiert, dass der 1-Mohm-Widerstand R1 nach der Diode (manchmal auch R4 genannt) nicht geerdet war, was zu 30 Sekunden dauernden Übergängen führte, wenn man von trockenem Boden auf Wasser wechselt, während er nur den Bruchteil einer Sekunde dauert, wenn er geerdet ist. Reparatur ist enifach.
Man kann auch sehen, dass bei wissenschaftlichen Artikeln, die von Laboren oder professionellen Nutzern veröffentlicht werden, ein ziemlich großer Prozentsatz nicht funktionieren kann, weil es keinen … Regler gibt! Es gibt mehrere Hinweise darauf. Schließlich, und das haben wir gemessen, kann die Frequenz 850 KHz oder 1,6 MHz betragen… Das ist nicht von grundlegender Bedeutung, da nicht die Frequenz, sondern eine Spannung gemessen wird. Wenn man sein Instrument kennt, verhindert es jedoch, dass man Dummheiten über das Vorhandensein oder Fehlen von Salz in der Erde macht, was die Leitfähigkeit verändert und die Messung der Dielektrizitätskonstante des Bodens beeinflusst.
Uwe
Um Lucas’ Frage (auch wenn schon etwas alt) hier mal zu beantworten. JA, es dringt Wasser über die Schnittkanten der Platinen ein, dadurch habe ich inzwischen 8 Sensoren geschrottet. Es löst sich die gesamt Isolierung ab und legt die Kupferflächen frei, so dass es hier doch wieder zu einem Ionenaustausch mit dem Boden kommt. Von völlig absurden Messwerten mal ganz zu schweigen. Ich hatte mal versucht, das Ganze vor der ersten Verwendung mit Nagellack auf den Kanten zu isolieren, brachte aber auch nur kurzfristig eine Besserung, länger als 3 Monate hat bei mir kein Sensor durchgehalten.
Held
Hallo,
ich bin der gleichen Meinung wie Ralf.
Bei Raumluft bekomme ich einen hohen Wert und im Wasser einen niedrigen .
Habe das Ganze mit einem ESP32 getestet am A0 Pin.
Der Serialmonitor gibt bei Luft einen Wert von ca. 2100 und mit Wasser ca. 700 aus. Die Werte verarbeite ich in der MAP- Funktion so, das sie einen logischen Sinn ergeben. Luft- niedrig, Wasser- hoher Wert zwischen 1 und 100.
Mit dieser Spreizung muß man nun selber ein Gefühl entwickelt was für die Pflanze nun trocken oder nass ist.
Nach einer Woche Test bin ich zu der Erkenntnis gekommen, das der Sensor unbrauchbar ist. Nach drei Tagen Messdauer ist der umgerechnete Messwert nur um 5 Punkte gefallen (85 auf 80). Die Erde obenauf wurde aber schon grau.
Darauf hin habe ich den Sensor heraus gezogen abgewischt und wieder eingesteckt. Siehe da, der Wert fiel um 50 Punkte.
Vor dem abwischen habe ich mir die Platine betrachtet, auf ihr befand sich ein Feuchfigkeitsfilm. Also hat der Sensor die Feuchtigkeit auf der Platine gemessen.
Die Erde herum war schon trocken. Ich habe Messung an einer anderenStelle im Blumentopf wiederholt, mit ähnlichem Ergebnis.
Eine automatische Bewässerung würde hiermit scheitern.
Meine Urlaubsbewässerung habe ich wieder auf Pauschalmenge umgestellt.
Gruß Eckard
Murphy
The sensor is said to be version 1.2 but there are differences from other 1,2 version available directly from china market. On the AZ_Delivery sensor, the LDO (U2) seems to be replaced by diode. There is not schematic offered on the web site :(
When supplied with 3.3V, sensor did not provide any output voltage (NE555 is requiring 5V supply). When supplied with 5V, sensor provide 4V on its output as dry (less voltage, when wet) . For 3.3V controllers (like ESP32) this can be fatal!
I have found (as possible solution) resistor of 100 Ohms in series to the 5V power pin is dropping the voltage over the sensor and impacting the sensor output voltage in positive way (3V as dry, less when wet) . This allows to work safely with ESP32 microcontrollers.
Samira
Hallo,
danke für Ihre nutzbare Aufgabe. Ich möchte diese Aufgabe mit STM32 und HAL_Drive schreiben. Wie kann ich letzten Teil schreiben? Wie kann zeigt , der Boden Nass ist oder trocken?
Viele Grüße
Samira
Dennis
Wenn ich den Sensor in das Wasser tauche und den Beispielcode “AnalogReadSerial” ausführe, liefert mir der Monitor lediglich Werte zwischen 0 und 13. Was mache ich falsch?
Klaus
sehe ich auch so wie Ralf.
Gruß
Klaus
Lucas
Dringt von den (Schnittkanten der Platine) kein Wasser in den Sensor ein?
Ralf
Hallo,
sind eure Werte für die Feuchtigkeit nicht verdreht, Müßte nicht zwischen 400 und 500 Patschnass und zwischen 650 und 800 Pflanzen haben Durst sein.
Gruss
Ralf