How does the temperature change throughout the day? To reliably record this data, a self-built data logger based on a microcontroller is ideal. In this project, a DS18B20 sensor is used to measure the temperature. The recorded values are stored at regular intervals in CSV (Comma Separated Values) format on an SD card and can then be evaluated.
hardware
An SD card is ideal for easily storing data and then transferring it to a computer. It can be controlled via the SPI interface.
With the following hardware, implementation is very easy using a shield:
Sensor (e.g. DS18B20)
Resistance 4.7kΩ (resistor assortment)
In this example, we are using the DS18B20 sensor. This is controlled and read via the OneWire interface. However, you can also use any other sensors use.
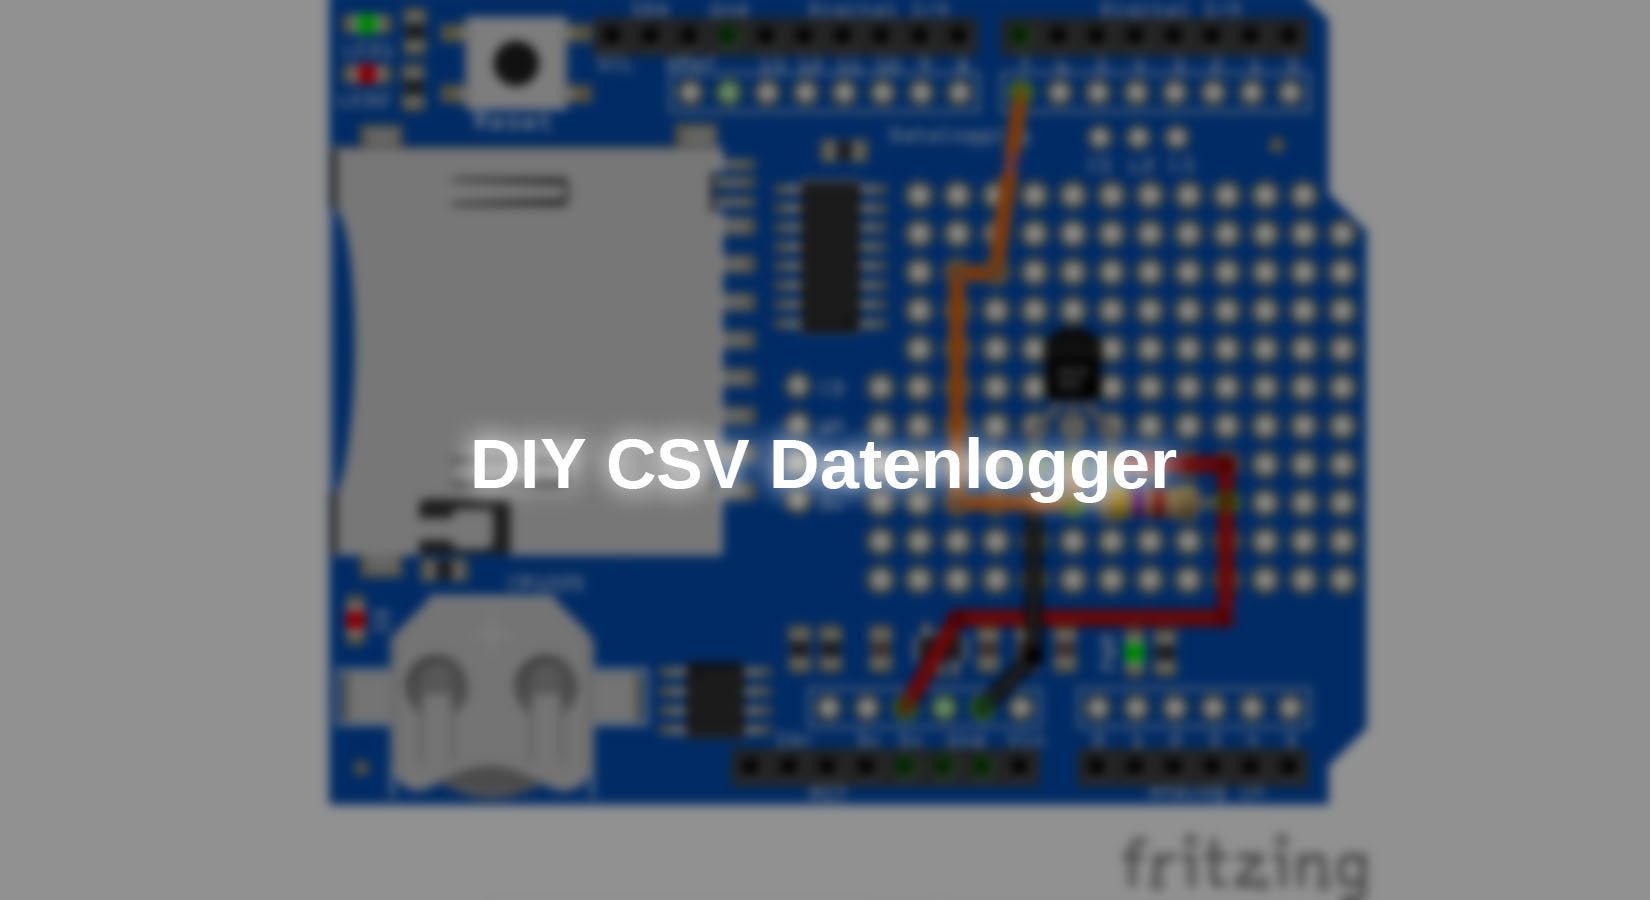
Solder the sensor onto the shield as follows:

Figure 1: Sensor on the data logger shield
software
sensor
The following external libraries are required to communicate with the sensor:
OneWire by Paul Stoffregen
DallasTemperature by jmchippa
These can be downloaded as .zip files from GitHub via the links provided and imported into the Arduino IDE under
Sketch > Include Library > Add .zip Library …
be selected and installed.
Alternatively, you can also install the library using the integrated library management system.
To test the sensor and the upper structure, load the following program onto the microcontroller:
|
#include <OneWire.h> |
Explanation:
At the beginning of the program, the objects of the library classes are created. The oneWire Object controls communication via the interface. The sensor The object sends the exact commands of the sensor via this interface, which is transferred with a pointer.
You can download the program here download.
RTC
There is a Rreal Time Clock module (RTC). This can be set and read using the I2C interface. Once the time has been configured, it is continuously updated by the small battery, even without power to the microcontroller.
The following external library is required to communicate with the RTC module:
RTClib by Adafruit
These can be downloaded as .zip files from GitHub via the links provided and imported into the Arduino IDE under
Sketch > Include Library > Add .zip Library …
be selected and installed.
Alternatively, you can also install the library using the integrated library management system.
The following program can be used to set the time and test the function:
|
#include "Wire.h" |
Explanation:
After the usual library file integration and creation of the object, communication with the RTC module is started in setup(), followed by the optional setting of the current time.
To set this time, remove the comment and adjust the time. Make sure that this line is commented out again afterwards, otherwise the time will be overwritten every time the system boots.
In loop(), the time and date are output via the serial interface.
You can find the code here download.
Data logger sequence

Figure 2: Flowchart of the data logger program
Data logger code
Finally, load the complete program onto the microcontroller:
|
#include <SPI.h> |
Explanation:
Compared to the two previous programs, only the output to the SD card has been added. The createNewLogFile() function creates a new file whose name is automatically numbered consecutively.
data analysis
After you have successfully recorded a series of measurements with the data logger, the values should now be displayed graphically in a spreadsheet program.
This tutorial uses LibreOffice Calc, as it is open source and available free of charge on all operating systems. However, all other programs are similar in terms of their operation and use.
1. Copy the .txt file generated by the data logger from the SD card to your computer's hard drive. Then right-click on the file and select "Rename." Change the file extension from .txt to .csv.
2. Open the CSV file with the spreadsheet program. A dialog box will open where you can select the separation symbols. Select "Comma" and confirm the import by clicking OK after checking the preview below.

Figure 3: Import window
3. Since the microcontroller outputs the sensor values with a period as the decimal separator, but the program expects a comma, you must now replace this.
To do this, open the following with the key combination Ctrl+Alt+F that Find and replace Window. Here you can replace all periods with commas.
4. Now select the column with the milliseconds and sensor values by holding down the Ctrl key and clicking on the column header, and select under Insert, Diagram…
5. In this window, you can now select the chart type. For a sensor value curve, we recommend the XY (scatter plot)

Figure 4: Window diagram
Here you can set the display mode and line type.

Figure 5: Final diagram with measured values
Conclusion
The data logger can be expanded with a button and an LED to enable status displays and simple control functions such as start and stop.
Possible applications include environmental measurement, indoor climate monitoring, and similar scenarios in which sensor values need to be recorded.
The steps shown above have introduced you to a cost-effective and flexible foundation on which you can easily build your own projects.
Have fun recreating it :)


2 comments
G Ranft
Hallo ich habe der Datenlogger getestet.
Allerdings lässt sich die RTC nicht ansprechen.
Sobald ich RTC auskommentiere zeigt er mir die Temperaturen an und schreibt sie auch auf die SD Karte, aber ohne Zeitstempel.
Muss ich auf dem Datenlogger Board noch was verbinden?
Beste Grüße
Gunnar Ranft
Eric LE GUENIC
Beau program