
Hello and welcome to our today's blog post!
In today's post we would like to show how you can operate a Raspberry Pi in kiosk mode.
We need for the project:
1x Raspberry Pi (3b or 3b+ recommended) including power supply
1x matching microSD card with at least 4GB
1x HDMI cable
1x screen with HDMI input
1x Ethernet cable
For the installation:
1x USB keyboard
1x USB mouse
The Raspberry Pi is connected via HDMI to a screen that displays information. You probably know such displays from the canteen, the school, the waiting room at the doctor or the information boards that you encounter in everyday life.
In our case, the content of a web page is to be displayed on the screen. This way the data can be updated easily and centrally, very practical if you want to keep an eye on a company network or your home automation.
Our Raspberry Pi should switch on the screen at a certain time, and then switch it off again in the evening.
For this, the kiosk mode of the Chromium browser is useful, but today we use a ready-made image on SD card called "chilipie-kiosk", where everything is already prepared and thus easy to put into operation.
The installation
We invite ourselves in the first step ofhttps://github.com/futurice/chilipie-kiosk down the current SD card image and flash it using EtcherOn an SD card.

To do this, we select the chilipie-kiosk image as the source, the SD card as the destination, and click "Flash!". All data on the SD card (or the selected target drive) will be deleted!
Now insert the SD card into the Raspberry Pi, and connect a keyboard, the screen, the network cable, and if desired a mouse.
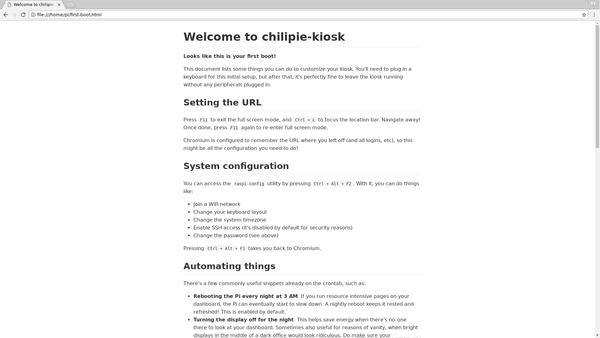
After the first start, a logo with the message "Please wait" will appear.

After a short time, we are greeted by a locally saved web page explaining a few things about the chilipie kiosk.

The display is a locally stored web page in a Chromium web browser in full screen mode.
If we now press F11 on the keyboard, we leave the full-screen mode, and see a typical browser window with address bar. With the key combination Ctrl + L we jump to the address bar, and can enter our target URL there.
The browser remembers the currently entered address and the login information, and after a restart it will automatically go to the last address used.
As a test, you can enter the URL of our store here: www.az-delivery.de

Configuration of the system
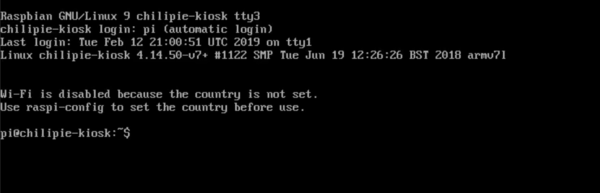
Several terminals are already predetermined, between which you can change by using the key combination Ctrl+Alt+function key.
Ctrl+Alt+F1 is the current view. The graphic surface including the chromium runs here. By means of F11 we can switch between normal mode (with visible address line) and the full screen mode.
Ctrl+Alt+F2 is the Raspi-Config Tool. Here you can change the password, change the network settings and much more.

Ctrl+Alt+F3 gives us a Linux Shell in which we can make further settings.

If you use a German keyboard layout like me and do not know the Querty layout by heart (especially the special characters), the work in the terminal can quickly become frustrating.
Therefore, in this example we change the keyboard layout. For this we go with the key combination Ctrl+Alt+F2 in the Raspi-Config Tool, and choose point 4 "Localization options", Followed by point 1 "Change Locale".


We scroll down to the point "de_de.utf-8" (or de_at for Austria, de_ch for Switzerland etc), and choose the entry by pressing the Vacant bar out.

Next we are asked what the locale for the system environment should be. Again I choose de_DE.UTF-8.
Now we go to "<finish>", so that the Raspberry Pi executes a reboot, and then go again with Ctrl+Alt+F2 into the raspi-config tool.
Here we can now change the password of the user "pi" in the first menu item, change the hostname, set the timezone, and under "Advanced Options" possibly enable overscan if there are black borders on the screen, or as in my case the text does not quite fit on the monitor.
To automate processes time-controlled, chilipie-kiosk uses the cron service. The settings are saved in a text file. To edit them we have to go to the shell. For this we press Ctrl+Alt+F3.
To edit the table we give the command "Crontab -e" for "edit". Here we are asked which editor we want to use. If you are not sure, you should be available for entry 2 "Nano" Decide because it is easiest to use. To move the cursor, we use the Arrow keys.

We comment on the times for automatic on or off by "#" Remove at the beginning of the line and, if necessary, adjust the time according to our specifications.
By means of Ctrl+X Let's leave the Nano Editor and confirm that we want to save the changes with the Key "J". The proposed name is, ok, so we confirm it using it with Enter.
Final information
If a yellow lightning symbol is displayed at the top right of the screen, this means that the power supply used is too weak.
Depending on the screen used, it is quite possible that there will be problems when switching the screen on or off. Often, this can be controlled in the screen's settings (automatic shutdown after X minutes).
Public displays are a preferred target. Therefore, the whole thing should be installed in such a way that the connections are not accessible for unauthorized persons.
Adjust the start screen
The logo that is displayed at startup, with the unicorn and rainbow colors, is not optimized for use in very serious environments like government offices, schools, etc. Therefore, we will still show you how to change this startup screen. The easiest way to do this is if you can place an image on a web server.
We have prepared a very tasteful image, and put it on our server for you.
On the chilipie we first exit the full screen mode by pressing F11.
Now we enter the following URL in the address bar (depending on your keyboard, the y and z keys may be reversed!): www.azde.ly/blog/Background

After the picture has been opened, we click the picture with the right mouse button and choose the option "Save image...".

In the "Save" dialog we click on "Personal Folder" in the upper left corner, and then on the already existing file "background.png" which we want to overwrite.
In the next step we click on "Save" in the lower right corner and confirm in the last step that we want to replace the existing file.
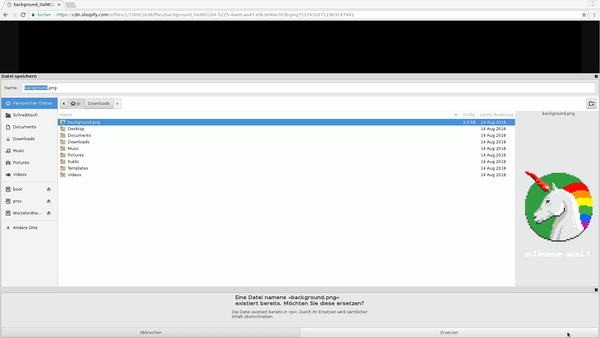
From now on the AZ-Delivery logo is displayed at startup!
Now do not forget to adjust the URL again, so that after the restart the desired page is displayed.
We hope you enjoyed today's article, and we are curious where you will use this project. From the status display of your home automation, to displays in waiting rooms at medical practices, or day tickets in the canteen, much is feasible.


7 comments
Some1
Ich bin jetzt mittlerweile einige Kiosk-Pi-Images durchgegangen, DietPi oder selbst gebasteltes über RasPi OS oder den Firefox ESR Kiosk, immer hat irgendwas nicht gepasst. Dieses hier ist perfekt mit Sternchen, vielen Dank.
Brinkmann
Hallo, kann ich das System auch ohne Tastatur und Maus über ein Terminalprogramm wie z.B. Putty Konfigurieren ? Welches sind die entsprechenden Dateien. Vielen Dank im Voraus. Mit freundlichen Grüssen Klaus-Dieter Brinkmann
Thomas
Danke für das image und die tolle Anleitung/Erklärung!
Habe es unter einem Raspberry Pi 3 jetzt am laufen!
Jetzt habe ich aber noch zwei Fragen:
1.) Läuft es auch auf einem Raspberry Pi 4 ?
2.) Kann ich das Bild vom Raspberry auch drehen um 90‘ Grad?
Vielen Dank
Gruss
Thomas
Andreas
Danke für das Image, funktioniert auf Anhieb prächtig!
Ich verwende einen qualitativ hochwertigen 17" Touchscreen an meinem PI4.
Wie könnte ich bitte das Backlight des Monitors über die Commandline steuern? Ich suche und probiere seit Tagen vergebens.
Danke für eine Rückmeldung im Voraus!
Manuel Wenger
Hallo und danke für die ausführliche Anleitung, Läuft soweit prima und stabil seit einer Woche.
Hätte da aber noch 2 Fragen dazu.
1. Ist es Möglich eine feste http Adresse festzulegen zu der der Pi nach einem Reset zurückkehrt. Momentan gebootet er ja mit der letzen Adresse die aufgerufen wurde.
2. Ist es möglich Seiten zu sperren, bei mir gehts um ein Buchungssystem für Tennisplätze, auf dem es einen Link zum Hersteller gibt, und wenn man den klickt kommt man nicht mehr auf die Buchungsoberfläche zurück.
Vielen Dank
Manuel Wenger
Roger
Hallo AZ-Delivery
Danke für diese tolle Anleitung!
Ich benötige dies für mein SmartHome Display (Anzeige einer IoBroker Webseite). Da meine alte Konfiguration mit dem Midori Browser Probleme machte, wollte ich auf Chronium umstellen und bin durch Google auf euch gestossen.
Das Einzige was mir noch Probleme macht, ist, dass ich die Funktion des Bildschirmschoners benötige welche im Chilipe-kiosk Modus Standardmässig nicht aktiv ist. Ich habe am Raspi (HDMI) ein Waveshare Display angeschlossen welchen ich mit dem Display on /off Script auch problemlos ein / aus schalten kann. Nur schaffe ich es nicht, dass der Display 1-2 Minuten nach der letzten Mausbewegung (Touch-Panel per USB) aus geht. Einschalten sollte er wieder, wenn der Touch-Panel erneut berührt wird (Maus Signal per USB).
Habt Ihr mir eine Idee wie ich den Screensaver wieder aktiveren kann?
Übrigens, die von mir beschriebene Funktion hatte unter Midori super funktioniert. Ich fände es toll, wenn Ihr das Tutorial um diesen Punkt ergänzen würdet, Gibt sicher einige die Ihren Display mit der Touch Funktion steuern möchten.
Liebe grüsse
Roger
Hacksaw
Ich habe eine Webseite mit Passwortschutz.
Bei jedem Refresh muss ich das Passwort neu eingeben.