Bluetooth BLE as a "virtual USB cable"
The idea
I was happy to see how many committed electronics technicians individual projects, such as the "Tdmm the speaking multimeter“Having up.
So far, for example, the TDMM is either completely independent and is operated via its switches. Or you want to use the entire range of functions, which has so far been necessary a PC + USB cable. Because the TDMM offers a number of commands with up to four parameters that are to be entered.
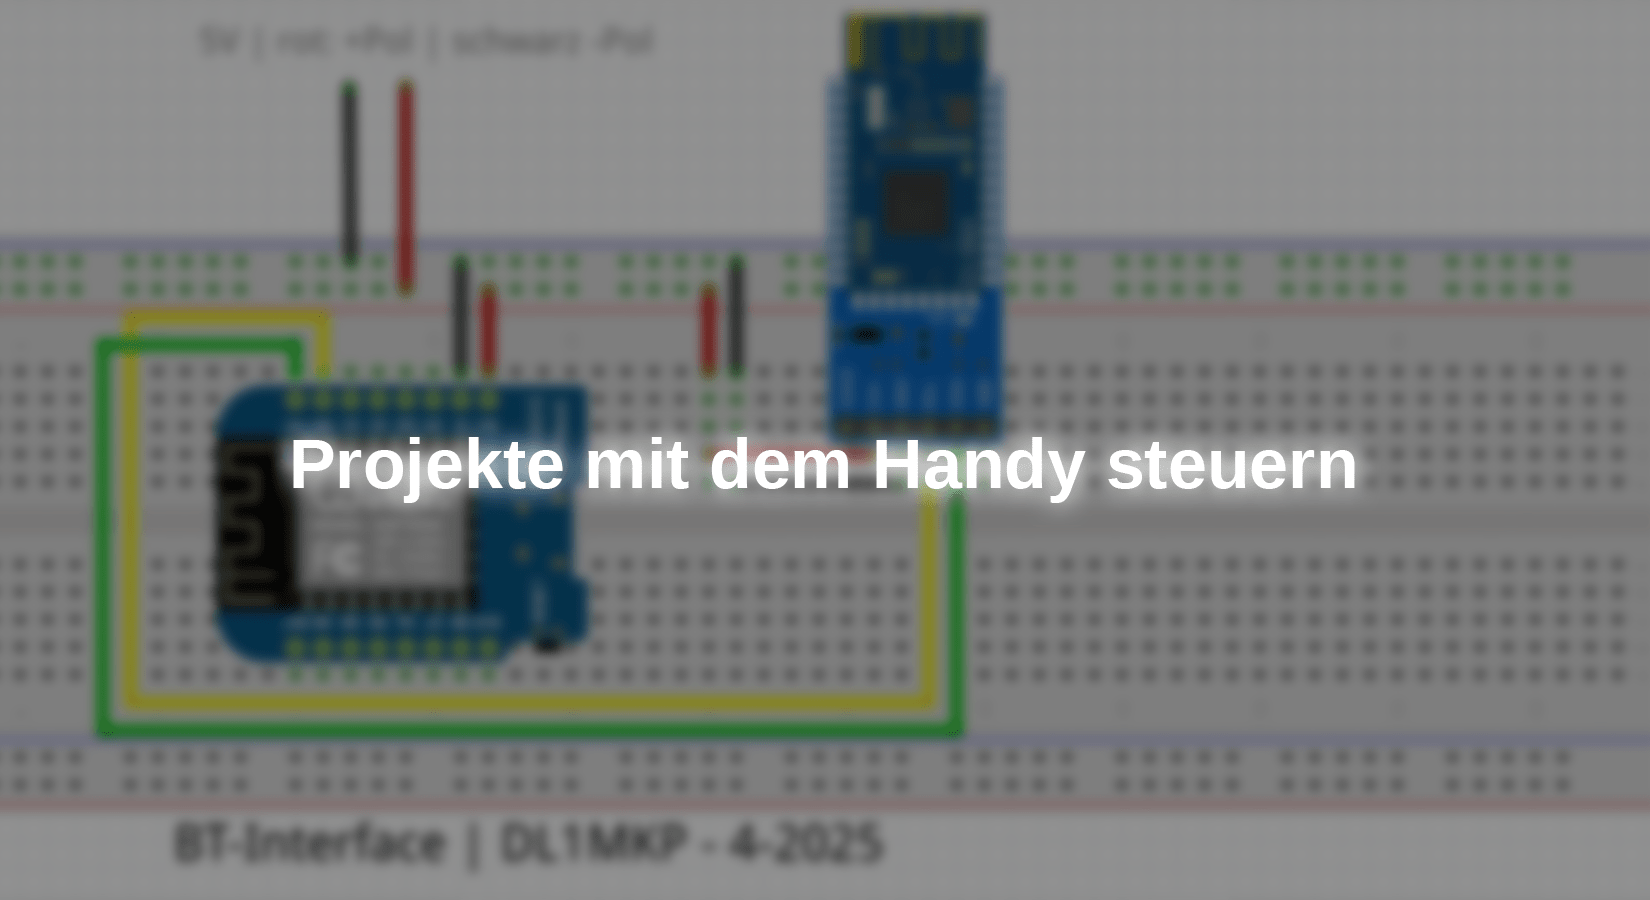
It is now without a PC if you retrofit a Bluetooth Serial module, e.g. the HM-10 and both the module and the connected device (i.e. not via USB).
These components are required
The Bluetooth Serial Module HM-10
The module is compact, inexpensive and easy to use. The connections are self -explanatory. The pins enable and state are not required for our application.


To connect the module to a microcontroller, connect RX - TX of the HM -10 to the RX - TX of the microcontroller "cross". Complete! Then you connect both assemblies to the same power supply. A really foolproof hardware structure, which nevertheless allows us to control our projects via Bluetooth in the future. This is a real benefit and is really fun.

Photo 3: Fritzing - structure
Now we come to the challenges.
The challenge lies in the sketch
Our task is now to anchor control in the sketch. The sketches of my last projects were partly extensive, but the command processor used was clearly broken down.
To make the procedure clear, I wrote a test application. It picks up the already known elements from the TDMM or the LabSupply M401. The linchpin is always the command processor. Let's take a closer look at the code:
//mit diesem Testprogramm kann erprobt werden, wie Projekte über BT
//gesteuert werden.
//Michael Klein | DL1MKP | für AZ-Blog 4-2025
//Andere Projekte auch unter art-of-electronics.blog

#include <MD_cmdProcessor.h> //Bibliothek des Commandprozessors CP
#define ARRAY_SIZE(a) (sizeof(a)/sizeof(a[0]))

void handlerHelp(char* param); //Hilfefunktion des CP

void handlerW(char* param) // Meldung auslösen
{
  Serial.print("Hello World - bin hier\n");
  Serial.print("Geht es dir gut?\n");
}
void handlerU(char* param) // Simulation: Spannung einstellen
{
  float  u = strtod(param, nullptr);
  String result = "U=" + String(u) + "V\n";
  Serial.println(result);
}

void handlerB(char* param) // 5x Blinken
{
  int n = 5;
  while (n > 0) {
    digitalWrite(2, LOW);
    delay(300);
    digitalWrite(2, HIGH);
    delay(300);
    n--;
  }
digitalWrite(2, HIGH);
}

void handlerN(char* param) // Buffer leeren
{
  Serial.print("\n"); //neue Zeile erzeugen ohne Fehlermeldung
}

const MD_cmdProcessor::cmdItem_t PROGMEM cmdTable[] =
{
  { "@?",  handlerHelp,  "",    "Help", 0 },
  { "@h",  handlerHelp,  "",    "Help", 0 },
  { "@b",  handlerB,     "",    "Blinken", 0},
  { "@w",  handlerW,     "",    "Hello World - bin hier", 0 },
  { "@u",  handlerU,     "u",   "Usoll: [V]", 0 },
  { "@",   handlerN,     "",    "Show Buffer", 0 }, //Neue Zeile ohne Fehlermeldung auszulösen
};
MD_cmdProcessor CP(Serial, cmdTable, ARRAY_SIZE(cmdTable)); //Instanz des CP bilden

void handlerHelp(char* param)
{
  Serial.print("LF einstellen.\n");
  CP.help();
}

void setup()
{
  Serial.begin(9600);
  pinMode(2, OUTPUT);
  digitalWrite(2, HIGH);
  CP.begin();
  CP.help();
}
void loop() { //Kompaktes Hauptprogramm
CP.run();
}
We see the preparation of the command processor in the first x lines. The "handler" functions are defined before the setup. These are here:
handler Triggers a text message when calling.
handler Simulates a voltage measurement or setting, as used in the TDMM.
handler The LED_Builtin of the D1 Mini V3 flashes five times.
The functions show the input and output of data. They are served exactly as the functions they know from my other projects.
handle is a special function that has arisen from practice. We come back to it as soon as we deal with the Bluetooth app with which we want to control our projects.
This is followed by the instruction table for the command processor with its special syntax, which we are already at previous projects have got to know.
As usual, follow below this table of the Handler Help. Only then will that Set up made. The Void Loop () is very compact: it only contains the instructions to the command processor: Cp.run ().
So far everything is quite clear and certainly easy to understand. The programming example also makes it clear how the Bluetooth control is integrated. The effort is completely limited to adapting the instruction table. We will see right away why this is necessary.
The Bluetooth Serial app
Despite intensive research, I found only this one, suitable app in the iPhone app store. There are numerous BT apps, but only this one app offers serial data traffic. I ask for a message if there are other apps and I have not found them.
(A friend confirmed that there is also a corresponding app for Android.)
Photo 4: Photo of the BT app from the mobile phone
The app takes some getting used to and so I can explain the procedure before frustration arises.
Behind Bluetooth Serial is an application for Atmega or ESP microcontrollers with their own libraries and functions. This allows you to press "virtual buttons" on the mobile phone and thus trigger functions, use a joystick and process texts in and out. We only use the latter function.
We don't need these libraries for our project! We use the app how it comes and only the text mode there. I explain how to create an application with it step by step.
First open the application. You get this selection offered:

Photo 5: Start screen
Please select "Connect Board" and now see your HW-10 adapter as "BT-05" to click. After you have connected - this is quite fixed - see a selection of currently existing boards:

Photo 6: Board selection
We want to have a board that only processes text messages. The upper board in the photo, which symbolically shows on a screen "123", is exactly what we need.
We are now taking a "step to the side" and discussing how to create such a board if it is not offered. I had to create it myself.
Create your own board
To do this, press the "+" button at the bottom of the edge of the screen. Then select "Custom Board".
You will immediately receive a selection with "Rows" and "Columns". Please choose the "1" for both, because we only want to have a text field. You make this selection with "Select".
Next you will see a completely empty screen. Somewhat confusing ...
Press the "+" button again and you can see this screen, the text field symbol on the left edge. Tap there and leave this screen with the "arrow down".
The result looks like this:

Photo 7: text board
Now you would like to use the text function and tap the "123" symbol once. You see:

Foto 8: Black-Screen
Confusing - right? The black circle with three lines is only opened when you tap it. I've already done it for this photo. This black surface can be revived with functions from the Library Bluetootherial. We are now taking the direct path.
Behind the icon, which shows something like a file container (?), The goal of our wishes hides the text in/ output:

Photo 9: Text E-A
In the "Send" field, enter the instructions and send it to your D1 mini with "Send". The answers come back in a somewhat idiosyncratic format. We look at that.
Communication via Bluetooth series
There is no really good description for the app and hardly any configuration options. Let's take a look at the special features.
Each instruction is preceded by an "@"
Why does that have to be like that?! ... But it means that we cannot take over the instruction tables that we know from the TDMM, for example. You may have wondered why I let every instruction start with a "@" in the example sketch. Unfortunately, the app only accepts this. In the settings for the text field (the famous gear) you can definitely empty the field for a pre -set sign. Nevertheless, the "@" always comes. Even if there is no "@" in the settings.
So I recommend double the instruction list. A handlerxy can be started from five different instructions. The only thing to do is enter the right handlerxy. At Help there is also "?" Or "H" as a possibility.
That may look like this:
const MD_cmdProcessor::cmdItem_t PROGMEM cmdTable[] =
{
{ "?", handlerHelp, "", "Help", 0 },
{ "@?", handlerHelp, "", "Help", 0 },
{ "h", handlerHelp, "", "Help", 0 },
{ "@h", handlerHelp, "", "Help", 0 },
{ "st", handlerST, "", "Systemeinstellungen anzeigen", 0 },
{ "@st", handlerST, "", "Systemeinstellungen anzeigen", 0 },
};
They no longer need to make more effort. This is the whole modification of your project and thus also to be prepared in good time in ongoing projects.
The text buffer
BLE works with text buffers. As a result, longer transmitted information - sometimes only one line - is not shown on the screen immediately. You send an instruction - and don't get any feedback. If you press the "Send" button with an empty broadcast text field, the buffer outputs the remaining characters. It's not really annoying, but you should know.
This also explains why we have an instruction for handle have created. This dealer only sends an LF. So that there is no error message, this "empty command" is included in our sketch.
Let's look at a few examples with our sketch:

Photo 10: @H_Help
Here I entered a single "H" (first line). He makes a "@H" out of it. White is always understood. The return responses appear green.
What you see as the first text is "set LF". This is a message that stems from the start of the computer, which as the first edition before the instruction table points out that an LF should be at the end of an instruction so that the instruction is recognized. You can find the code in Void Handlerhelp (Char* Param) right in front of the Void Setup ().
Immediately afterwards he does what he should, up to and including the instruction "W". Then I have to press Send again (it shows a white line with a single "@"). Then comes the last part of the instruction list that I wanted to call up with "H".
This dialogue behavior is unsuitable for longer texts. That wasn't our goal either.
Behind the instruction "W" we laid a two -line "Hello World ..." text. By sending a simple "W", this function is called up and appears:

Photo 11: @W_HELLO World
That's exactly how we want it.
There are because of the reference to TDMM and the LabSupply M401 an instruction "U" with which a voltage value is transmitted. In our case, the instruction is called "U 5.0". Please the "." observe the number of numbers.
This instruction can be used in this way to set a voltage value in the Lab Supply. It looks like this on the screen:

Photo 12: @u_ input_ voltage
Again, the system does exactly what it should.
With the "B" instruction, trigger a 5-fold flashing of the LEDBUilt_in of the D1 Mini V3.
To consider when uploading a sketch
If you have connected the modules and want to charge a sketch via USB on the computer, you should definitely depend on the power supply for the HW-10 module beforehand. Because the RX-TX connections are required for communication via the CH340 uart. This can lead to the upload failing.
If you want to further experiment
We had already found that we had the library Bluetooth series do not need. If you want to experiment with it, you can find information on the website: https://docs.henhen1227.com/docs/intro
The best comes at the end
After I had completed and sent in, I did not leave the rest that I like the solution quite well if you use the "BluetoothSerial" library to build an application with buttons, joystick and text, but not for pure text. With all possible search terms and AI support, I came up with the Bleserial Tiny application in the iPhone AppStore. This application corresponds to 100% exactly what you want for the control of my projects: a very simple app, completely geared towards text. You also no longer need to plague with a preceding "@". You can easily get your ongoing TDMM project (or any other project), install the HM-10 with four soldering points-done! Remember to make the HM-10 switch-off (elegant solution: power-on/ off via transistor that is connected to a non-documented pin). This is what the app in the AppStore looks like:

Photo 13: Bleserial Tiny
You start the app. This shows the possible BLE connections under "Connect". BT05 has already been recognized there. Click on - done! You can enter all instructions immediately and receive a clean text edition without compromises and buffer problems. A real dream! So we actually wanted it from the start.
Here is a dialogue as an example:

Photo 14: Dialog example with bleserial tiny
Now I wish you a lot of fun with this project and look forward to your feedback and comments. For example, if you have built a TDMM, you may want to retrofit the Bluetooth "remote control"?


3 comments
Josef Jamsen
nun… ich ab mir den Blog-Beitrag nicht wirklich durchgelesen…
mich macht aber stutzig dass ein separates Bluetooth-Modul Verwendung findet wo es doch einen ESP32-D1-Mini NodeMCU gibt welches auch Bluetooth kann…?
Es sei denn die “eingebauten” Bluetooth-Funktionen des ESP32 Moduls sind gegenüber dem “externen” Modul unterlegen / beschränkt…?
… dann sollten Sie aber die Unterschiede erläutern, warum Sie hier zu dem im Vergleich zum ESP32 mit integriertem Bluetooth doch recht teurem Zusatz-Modul greifen.
MfG. Josef
Michael Klein
Lieber Kees,
das Repository finden Sie hier:
https://github.com/MajicDesigns/MD_cmdProcessor
Viel Spass – viel Erfolg!
Michael Klein | DL1MKP
Kees
307 / 5.000
In Ihrem Projekt „Projekte mit dem Handy Steuern“ ist mir nicht klar, wo ich die Bibliothek MD_cmdProcessor finden oder herunterladen kann.
6 | #include // Bibliothek der Befehlsprozessoren CP
Kompilierung beendet.
Exit-Status 1
Kompilierungsfehler: MD_cmdProcessor.h: Keine entsprechende Datei oder kein entsprechendes Verzeichnis vorhanden.