Attaching things that have already happened in the blog posts of this series. In retrospect, the following facts were explained and three MQTT clients were built. Here is a short compilation.
- In episode 1 - MQTT - Raspberry Pi - Mosquitto and Node-Red we installed Node-Red and the MQTT server Mosquitto on the Raspberry Pi.
- In episode 2 An ESP8266 as a MQTT client and
- Episode 3 Expansion of the MQTT-Home system A second MQTT client with the ESP8266 and a monitor with an ESP32 for control and monitoring the system were created.
- To the clear Representation of the data recorded by the tool Node-Red Was it in episode 4. There the handling of the web interface of Node-Red was dealt with.

Image 1: The node-red dashboard interface to the real world
Today we want to deal with the protection of the data traffic, provided that this allows us the limited possibilities of the ESP8266. So welcome to the current episode:
5. Security in data transfer between ESP8266 and Mosquitto
The hardware and software, which are also required in this part, were listed and discussed in the previous episodes. Therefore, please use the links listed at the beginning for more information. In this post, in particular, are used in particular
Hardware:
- The DHT client from the 2nd episode
- The DS18B20 client from episode 3
- A Raspberry Pi with Mosquitto and Node-Red installation from Episode 1
- A PC with putty installation from Episode 1
Software:
- dhtclient.py From episode 2
- heating.py From episode 3
- Putty.exe From episode 1
- Mosquitto and node-Red on the Raspi Episode 1
- dhtclient.json As a product of the project from Episode 4
To homework from the 4th episode
After the detailed presentation of the node-Red dashboard, there was homework. We will now look at their solution right from the start.
It begins with reading the status quo through the file DHT-client.json. It contains everything that was created in Node-Red on nodes and flows last time. After downloading into any directory, we open the file in an editor of our choice and copy it into the clipboard, Ctrl+A, Ctrl+C.
We open a browser, for example, Chrome, and start our Raspi with Mosquitto and Node-Red. Do the two clients also run dhtclient.py and heating.py? In the browser we enter the address of the Raspi as URL, followed by port number 1880 for the call from Node-Red.

Image 2: Start Node-Red
About the menu, Let's start importing the JSON file's content from the clipboard.

Image 3: import flow
We copy the JSON code into the pink window and click on import.

Image 4: The content of dhtclient.json is imported
Because nodes are probably still in the memory from the last time, Node-Red brings the following message that we have with Import copy acknowledge.

Image 5: Message in import
In Flow 1 we now see the nodes from the previous episode, once on the work surface and also in the side column under the rider info.

Image 6: The flow from the 4th episode
First, let us have a new tab with the name Heating Create and Configure. We call up the display of the dashboard objects via the small triangle and create it by left click +Tab to the new tab that we edit immediately.

Image 7: Show dashboard objects and create a new tab
![]()
Image 8: Edit tab
We give the name Heating To update the condition.

Image 9: Name a new tab
In the new tab, we create two new groups, Temperatures, and Switch, which we also edit.

Image 10: generate new groups in the heating tab

Image 11: Edit Group Temperatures
Similarly to the existing nodes, we define nodes for the recording of flow and return temperature, the display of which is determined by measuring instruments, as well as the operation and feedback of the switches. A double click on the nodes, as we know, opens the property window for processing.
The MQTT-Node has only a few properties.

Image 12: MQTT-NODE heating flow temperature
This is what the area with the newly created nodes now looks like.

Image 13: The new nodes
A few more settings are necessary when displaying the flow temperature.

Image 14: Display flow temperature
Corresponding property values apply to the return. The properties of the two switches and their MQTT nodes are still missing.

Image 15: Properties of the pump switch

Image 16: MQTT-NODE of the pump
The data of the switch for the burner is entered analogously. The new flow is ready.

Image 17: The new flow is ready
To publish we click on deploy And continue switching to the dashboard.

Image 18: Correct dashboard layout
The dashboard's presentation in the browser reveals a wrong arrangement of the nodes in the group switch. The positions of the lead and return are also not correct.

Image 19: The switch arrangement is not correct
We, therefore, switch into the layout view and make sure that the locks are open, then you can move the nodes (light blue fields) against each other. Then we click the locks so that nothing can change on its own.
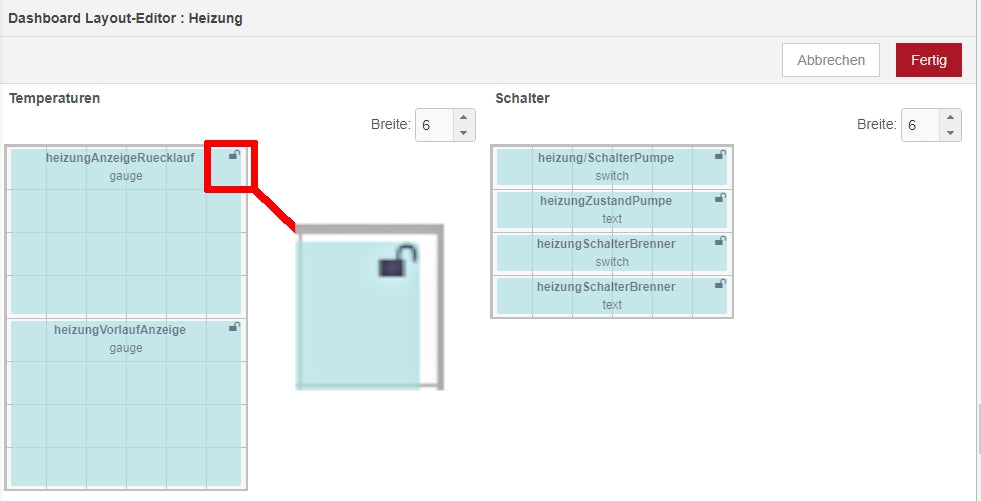
Image 20: Change arrangement by pushing
Now only the chart node for the warehouse cellar temperature is missing. We get it from the dashboard folder in the column to the left of the work surface and connect its input to the output of the MQTT node Cellar temperature.

Image 21: Insert chart
Double -click on chart opens the properties.

Image 22: Edit chart node
The three horizontal lines hide the menu for switching between the tabs basement, cellar, and Heating.

Image 23: Switching to the basement tab
To secure work, we create a new JSON file via the menu item export.
Protection of the data transfer
Let us now turn to the topic of security. So far, each participant (or intruder) can send messages to the broker in our network or access them. We used this to test the clients from the command line of our Raspis. I send one thing ahead. An encrypted operation is unfortunately not possible with the ESP8266 Because this controller does not support client certificates and has too little memory. This means that all data, including passwords, are transmitted unencrypted. However, this should not be a problem in the local network. In addition, there is still the possibility to send the payload of the messages in plain text but to send it according to your own encryption methods and decode accordingly.
Even without TLS, we will now regulate the access to Mosquito Strict rules by introducing user password pairs and also drawing access rules in a so-called Access Control List (ACL).
For these purposes, I opened two Windows terminals as an SSH connection via Putty. You can also work in terminals directly on the Raspi.
We first take care of the users who are supposed to register with a password to Mosquitto. We could do every user and by that I mean each of our clients, dhtclient, heating, and monitor, as well as the chief user, named master, Lay individually by hand. However, it has advantages to create a file with this data if it is several users.
So we switch to the directory in which this file mosquitto_users.txt should arise.
CD /etc/mosquitto/conf.d
sudo nano mosquitto_users.txt
The following lines are recorded as text. You can of course name the users differently and assign any passwords to them, but The last line must not receive a line feed!

Image 24: User access file
Then we save the file (Ctrl+O) and end the editor (Ctrl+X). I strongly recommend creating a backup copy from this file. I will tell you the reason for this.
CP mosquitto_users.txt mosquitto_users.txt.sic
Mosquitto expects the passwords in encrypted form. The conversion from the readable form into a hash does the following line.
sudo mosquitto_passwd -U /etc/mosquitto/conf.d/mosquitto_users.txt
Then our file looks like this.
cat mosquitto_users.txt
Output:
dhtclient:$7$101$etntaogedh1o1ef$ZB3LOJ2VIII6SZ9S1KPVZ4NCR0QOGXL1FH8S0TPLEAV6U9FAYMLPZ4L6WT8XDCVGOBFIJCAP7SCX+Pinnmvq==
heating:$7$101$M5P1DDY9BLNOMLAO$Eov2rgjgeihnbd02xrhl8z+vav9wpi8ichx2wrx5aybk0w2nhper7bp4mtrqpg68ysh4uurr/XUWKKS75XBVZQ==
monitor:$7$101$bxlltf++Lwbwqgnv$Gft70nirqesflz2rnblqfotcporriqjuqh4gc6lxrrpnjnue/bpofbkdum0r0p7imor+L3TQ+EZWS5ZARHMBHW==
master:$7$101$JZ4B8+Dweva2sdmw$DH1TKFGR4AL3NPTG5K6R5ATCLATCLATLBF5B3FJY0DMI4BKTSXdresGJ8KY3/8C9S/27Iodrutiongqikenyba==
Doorbell:$7$101$Ljemzpvdpgckjad+$/K1+NH70Z/BJWC6UAYMOEBUTJQT+jfwrchy+hiw4jgbofbuwrturnwjm6gk8etywtri9pinsf0csr8vzbqltla==
In the event that you want to change a password, you can still fall back on the original file in the backup in order to overwrite the original file, carry out the changes, secure it, and then trigger the description again. Adding users can be handled similarly. You can also add individual users by hand.
sudo mosquitto_passwd /etc/mosquitto/conf.d/mosquitto_users.txt Doorbell
This command adds the user's Doorbell and asks for a password for him. With the option -D you remove a user.
sudo mosquitto_passwd -D /etc/mosquitto/conf.d/mosquitto_users.txt Doorbell
It is not advisable to replace a password hash in the file with a new plain text password and then transcribe the file again. The command mosquitto_passwd -u Do not differentiate between plain text passwords and already encrypted ones. Hashes are encrypted again in the procedure. As a result, the file becomes unusable and no more access to the broker is possible.
Next, we will teach Mosquitto via his Conf-file about now only to let us know well-known users. We copy the existing configuration file to the new one, circle the existing and edit the new one.
sudo CP -a 010-listener anonymous.conf 020-Restricted.conf
sudo MV 010-listener anonymous.conf 010-listener anonymous.conf.old
sudo nano 020-Restricted.conf

Image 25: New Mosquitto Config file
The config directory now contains the following files.
LS -lisa
output:
in total 28
258560 4 DrwxR-XR-X 2 Root root 4096 30. Dec 22:18 .
258554 4 DrwxR-XR-X 5 Root root 4096  5. Dec 06:07 ..
265774 4 -rw-r--r-- 1 Root root 35  4. Dec 19:14 010-listener anonymous.conf.old
258110 4 -rw-r--r-- 1 Root root 91 30. Dec 17:46 020-Restricted.conf
258108 4 -rw-r--r-- 1 Root root607 30. Dec 20: 11 mosquitto_users.txt
258561 4 -rw-r--r-- 1 Root root142  9. Jun 2021  Reap
Incidentally, Mosquitto allows the succession of several Conf files in the /etc/mosquitto/conf.d. The numbers as a prefix then control the order of the processing at the start, similar to how it happens with the links in the /etc/rcx.d directories when booting the system.
So that our clients can now contact the broker, they have to authenticate themselves when contacting them. The corresponding lines are complemented accordingly.
monitor.py:
    client = MQttclient(myid, mymqttserver, user="monitor",\
                        password="3E4R5T")
heating.py:
    client = MQttclient(myid, mymqttserver, user="heating",\
                        password="2w3e4r")
dhtclient.py:
    client = MQttclient(myid, mymqttserver, user="heating",\
                        password="2w3e4r")
Authentication must also take place when testing the system via a terminal.
mosquitto_pub -t "Heating/pump" -m "at" -u "master" -P "4R5T6Z"
Anyone who can drive a car can also get into a bus, but it is far from being said that he can drive it. So let's go one step further. So that not everyone who registers on the system can do everything, we will now introduce access restrictions that work similarly to driver's license classes.
So we create the file access.txt, which we fill with the following content.
sudo nano access.txt
# Access list
# all duherfen nothing at all
Topic Deny #
# Rights of the individual clients
User dhtclient
Topic Read Keller/fan
topic write Cellar/temperature
topic write Keller/humidity
topic write Keller/fan/done
User heating
Topic Read heating/pump
Topic Read heating/machine
topic write Heating/lead
topic write Heating/Ruecklauf
topic write Heating/pump/company
topic write Heating/machine/company
user monitor
Topic Read heating/#
Topic Read Keller/#
topic write Heating/pump
topic write Heating/machine
topic write cellar/fan
User Master
Topic Readwrite #
What does that mean? Well, the dhtclient If the measured values, temperature, and moist publishers are allowed, can also announce the switch position. However, he may also receive the requirement for the switch position.
heating may receive the switch actions and publish the switch position and the temperature values of the in front and return.
monitor reads all publications of dhtclient and heating And can switch the circulation pump, the burner, and the fan in the storage cellar.
Of course, the boss needs a named master, for monitoring and control as well as manually testing all the necessary rights.
We also make these ACLs known to the Mosquitto broker.
sudo nano /etc/mosquitto/conf.d/020-restricted.conf
listener 1883
password_file /mosquitto/conf.d/mosquitto_users.txt
Allow_anonymous false
acl_file /etc/mosquitto/conf.d/zufrang.txt
The changed software for the clients:
is in their boot.py Delivered and uploaded - restart with reset.
Mosquitto is also restarted.
sudo systemctl remaining start mosquitto
And so that Node-Red can have a say, the dashboard app also needs general rights. So we have to be our flow as master Let them log in.

Image 26: Node-Red applet with authentication data
Double-click on the Broker Node and opens its property box. On the security map, we give the credentials for master a - To update

Image 27: Credentials for the user Master
Provide flow - deploy.
Ready for the test? Let's go! Let's switch to the dashboard window. In both tabs, the values must now be re-enacted every 5 seconds. The relays on the clients must be controlled from the web interface and the feedback via the switch positions must be output. If everything works in accordance with the request, follow pleasant back now.
This post is also available as a PDF document for download.
outlook
In the next episode, it is still possible in the series "Server and Clients under Micropython on the Raspi and the ESP family" A front doorbell of a different kind. Of course, this project is also integrated into the MQTT family. This results in an application that not only announces visitors but also logs along day and time and ... became curious until the next time.


